12 Must Have Visual Supports for Students with Autism
Navigating the complexities of social interactions and communication can be challenging for autistic students. As educators, we play a crucial role in supporting these students by providing them with the tools they need to understand and manage their behaviors and emotions. One of the most effective ways to achieve this is through visual supports—powerful, visual aids that simplify concepts and provide clarity in various situations.
In this blog post, we’ll explore the use of visual supports that can enhance the learning experience for students with autism. From visual schedules and token boards to social narratives and emotional regulation supports, each tool serves a unique purpose in fostering communication, understanding, and positive behavior. By integrating these visual tools into your classroom, you can create a more inclusive and supportive environment where all students can thrive, develop essential skills, and feel empowered in their learning journey. Let’s dive into these valuable resources and discover how they can make a meaningful impact in your teaching practice!
1. Visual schedules
Visual schedules are a staple in many of our lives, not simply just for those with Autism Spectrum disorder. This is an important thing to remember because often times visual schedules get faded- when it is something we as adults use daily! Think about your calendar for your appointments, your planning, your to-do list—- all visual schedules!

OVERLOADED caseload? No idea how you are going to manage it all? This Summit is for you.

calling all SPED Teachers
OVERLOADED caseload? No idea how you are going to manage it all? This Summit is for you.
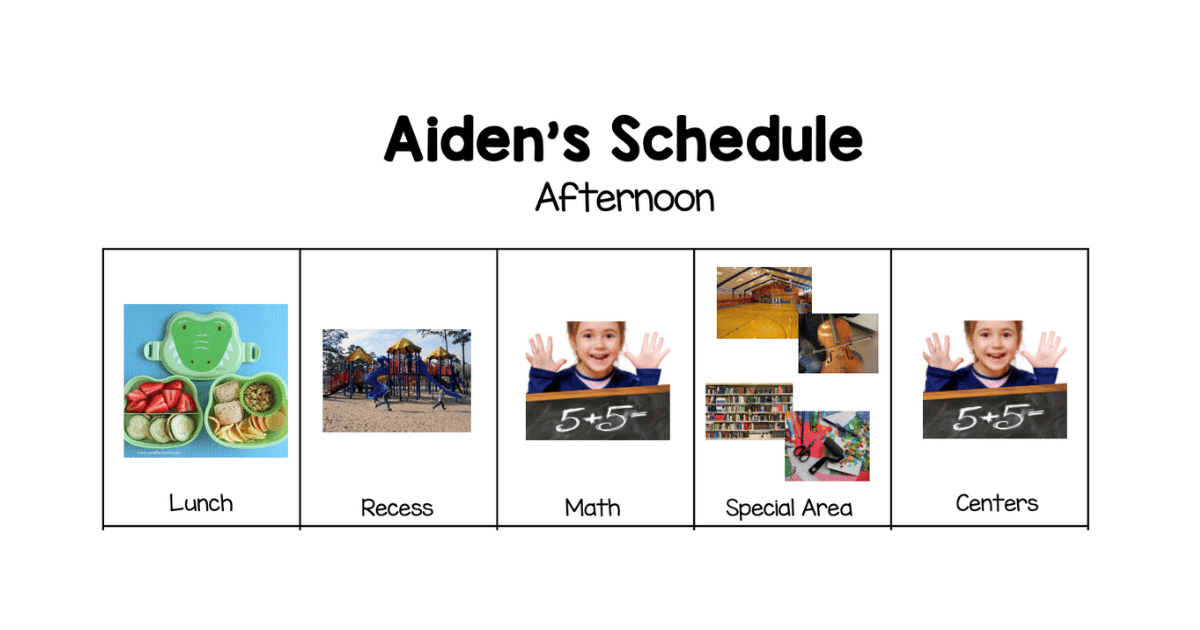
Visual schedules give kids a clear idea of what’s coming next, reducing anxiety and making transitions smoother. There are so many ways to use visual schedules depending on what works best for your students. There are several different types of physical schedules. There are object schedules, picture schedules, and word schedules. It will depend on the level your student is at for which works best for them. If you want some real life pictures for your picture schedule, click here for some.
Then there are mini schedules. These break down specific activities into smaller, bite-sized steps. For example, if you’re doing a craft project, a mini schedule might show each step, from cutting the paper to gluing everything together. This helps students focus on what they need to do next, one step at a time. This can be very helpful for longer blocks of time. If you need the visual aids to be able to do these, you can check out these visual directions. They can even support your entire class! Click here to check them out.
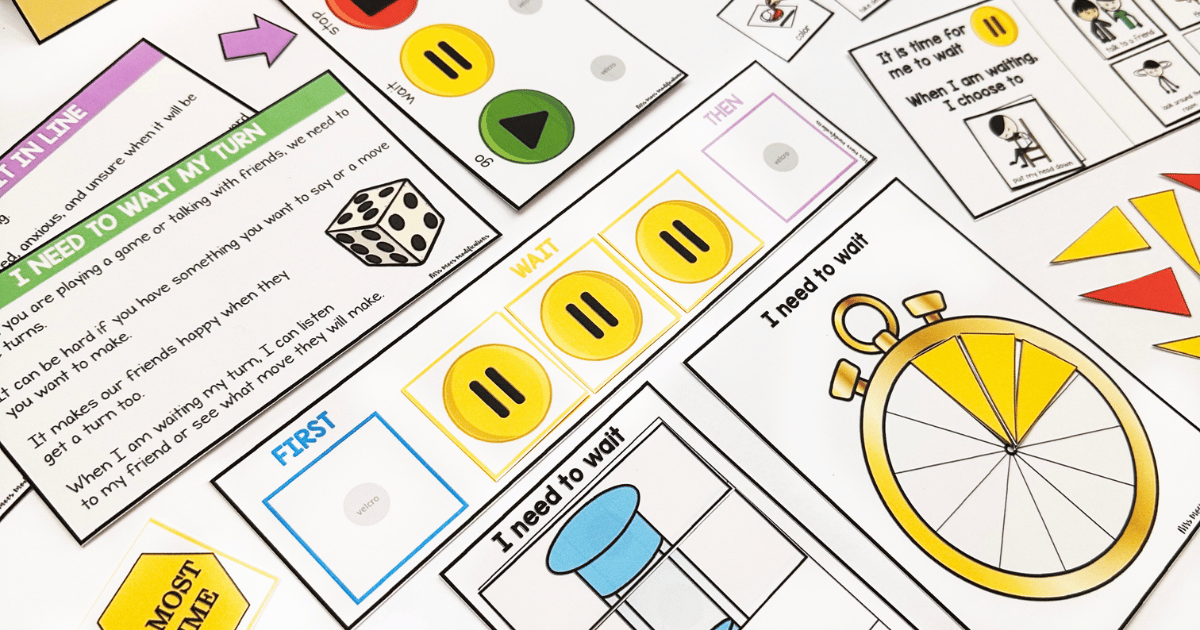
And let’s not forget First-Then schedules, the ultimate tool for reinforcing routine and expectations. They’re super simple—just two steps—like “First work, then play.” It’s a great way to motivate kids by showing them that something fun is waiting after they complete a task. It is important to remember that the use of a first-then board should be first the harder task, followed by a task that is more reinforcing. Instead of just saying first reading then math.
All of these schedules can work together to help your students. You do not have to pick just one!
2. Contingency Maps
Contingency maps are like a visual “choose your own adventure” for behavior! They show students the different paths their actions can take and the consequences (good or bad) that follow. Think of it as a roadmap that visually lays out what happens when a student chooses certain behaviors—kind of like a traffic light for decision-making.
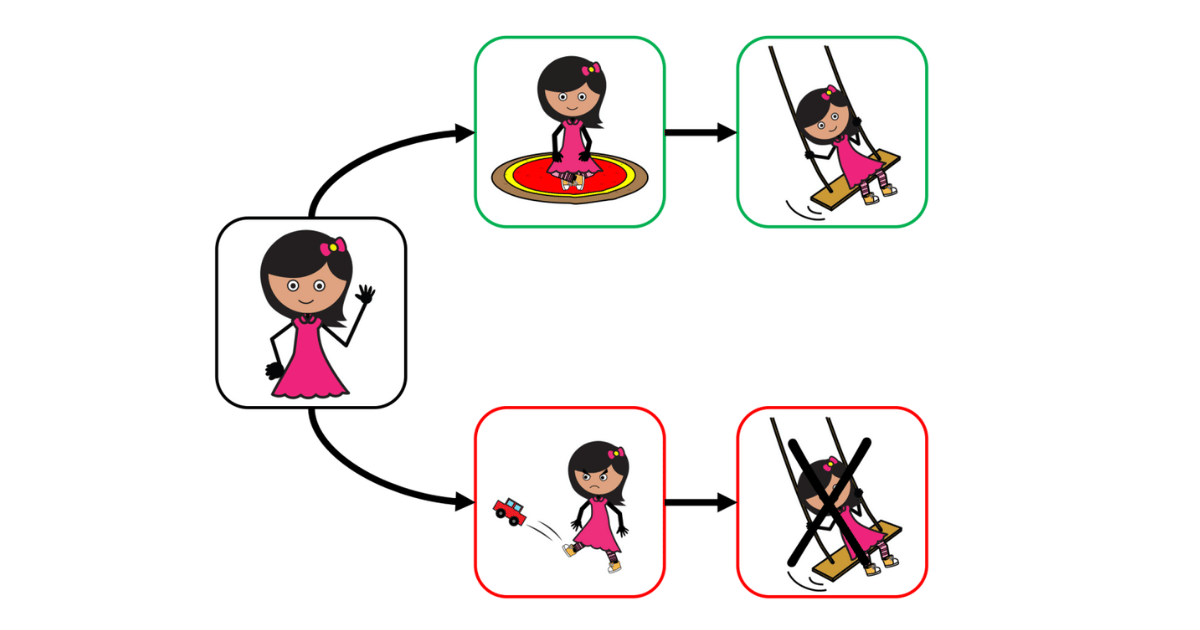
For example, a contingency map might show two scenarios: one where a student stays on task and earns a preferred reward (like extra playtime), and another where the student avoids the task, which might lead to losing a privilege or not earning the reward. (Be sure to not do a double jeopardy though- if students don’t get their reward, they don’t need another consequence on top of this). These help kids with autism understand the clear link between behavior and outcome without needing lengthy explanations.
These maps are great because they visually reinforce the concept of choice. Students can see how their behavior directly affects what happens next, helping them make better decisions on their own. Plus, it’s a helpful tool for encouraging positive behavior without constant verbal reminders—let the map do the talking!
Here is a free set of contingency maps you can download.
3. Core Vocabulary Boards
Core vocabulary boards are essential tools for supporting communication. These will be used more with students who use assistive technology. This will not be for all students, but as with all of our supports, we have to consider the specific needs of the learner.
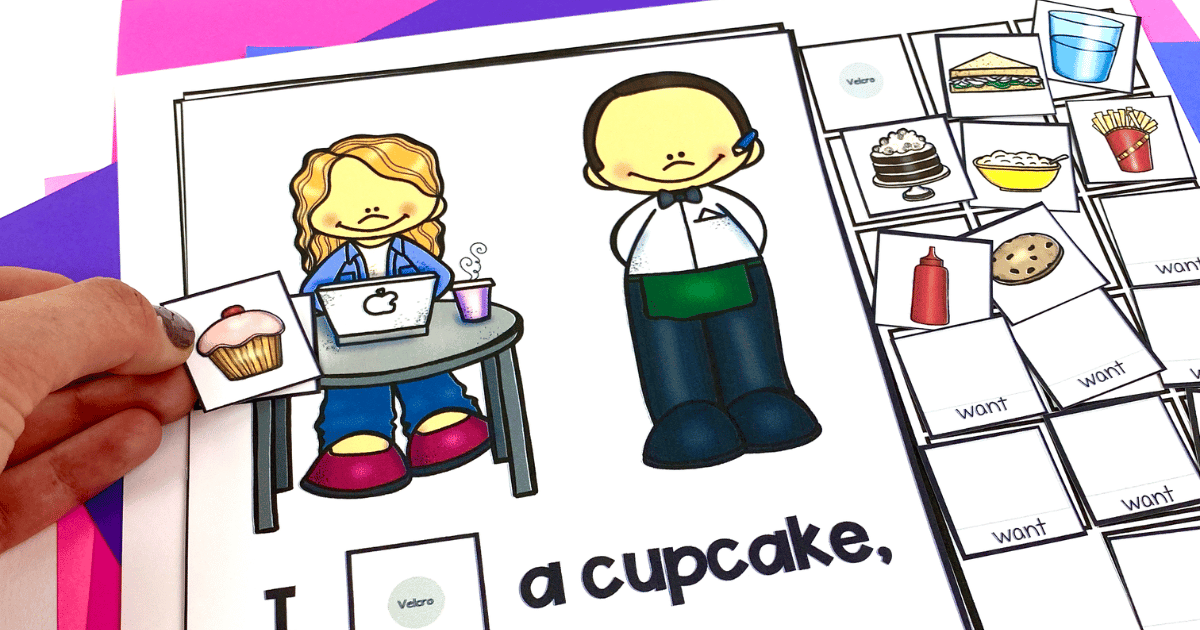
Think of core vocabulary as a bridge to help students express their needs, wants, and feelings without getting overwhelmed. These boards typically feature a set of high-frequency words—like “go,” “help,” “more,” and “stop”—that can be used across a variety of situations. They are NOT space specific words- like all of the words you need when you are in art class (paint, draw color etc.) more on that next!
The beauty of core vocabulary boards is their versatility. These words are the building blocks of communication and can be used in nearly any context. For example, if a student wants to request more playtime during recess, they can simply point to the word “more” on their board. If they are in lunch and need more ketchup- they can again say ‘more.” When they go home and they want more time to read before bed- you got it, they can say “more.” As opposed to having to learn all of the different places and words for playtime, ketchup, and reading. This empowers them to communicate more effectively without the need for complex sentences, making it easier for them to participate in classroom activities and social interactions.
If you want to teach your students using core vocabulary, here is a FREE unit for the core word want.
4. Fringe Vocabulary Boards
Fringe vocabulary boards are fantastic resources that add a personal touch to communication for students with autism. While core vocabulary boards focus on high-frequency words that can be used in many contexts, fringe vocabulary boards hone in on more specific words tied to a particular area or activities. Think of fringe vocabulary as the icing on the cake—it’s what makes communication even more flavorful and personalized!
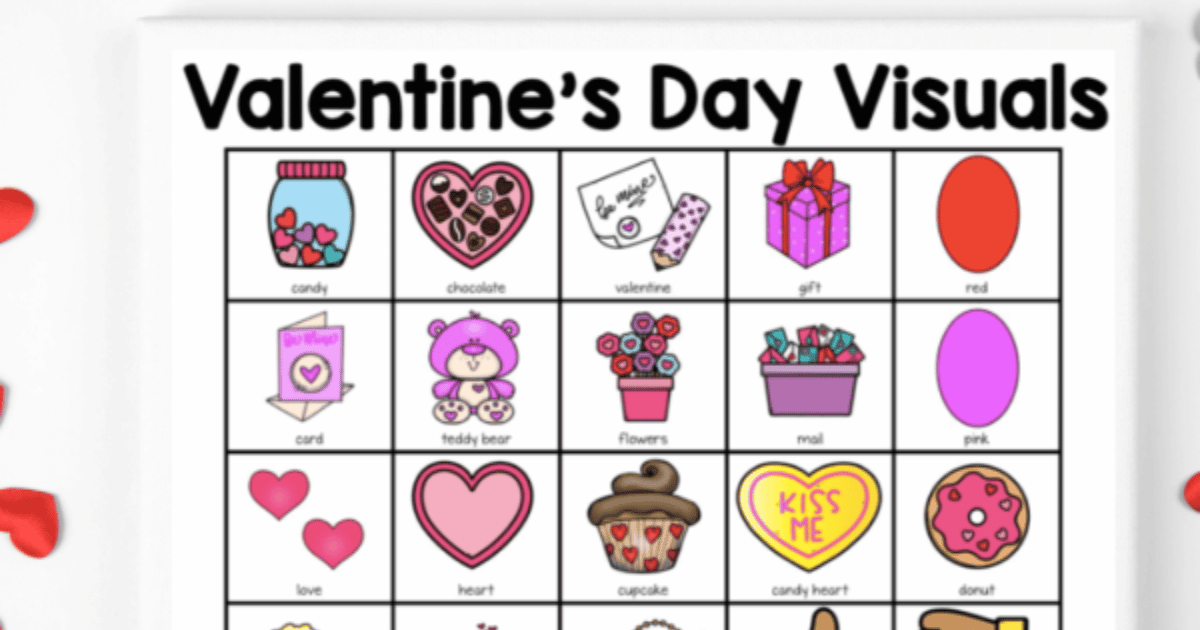
For example, you can create fringe vocabulary board for the holidays. So for Thanksgiving you can have a board with specific foods and activities a student may participate in to allow them to share about their holiday. You can even have a fringe board for activities done of the weekend. This way on Monday morning, your student can pull out that fringe board and tell you what they did over the weekend!
These boards are especially useful during thematic units or specific activities. If you’re working on a science project about plants, you could add words like “flower,” “leaf,” and “grow” to the board. This specificity supports vocabulary development in context and helps students express themselves more fully during discussions or group work.
Creating a fringe vocabulary board can be a fun, collaborative experience. Invite students to help select the words that matter most to them, making it a meaningful and engaging process. This not only promotes ownership of their communication tools but also fosters connection with their peers. By using fringe vocabulary boards in your classroom, you’re encouraging students to express their unique voices and interests, paving the way for richer, more personalized interactions!
5. Visual Cues
Visual cues are powerful tools that can help autistic kids understand expectations and navigate their environment more easily. Think of them as gentle reminders that provide clarity without overwhelming students with verbal instructions. These simple images or icons act as prompts for specific behaviors or actions, making it easier for students to grasp what’s expected of them.
For example, a visual cue like a picture of a quiet voice can signal to students when they need to lower their volume, while an image of a sitting child can remind them to stay seated. These cues can be displayed throughout the classroom, making it simple for students to reference them whenever they need a little nudge in the right direction.
One of the best things about visual cues is their versatility. They can be used for everything from classroom routines (like lining up for lunch) to specific behavioral expectations (like using kind words). This can help reduce anxiety, as students know what behaviors are expected in different situations without relying solely on verbal explanations.
Top visual cues:
6. Visual Directions
Visual directions are essential tools for supporting students with autism, helping them follow instructions and complete tasks with greater independence. Think of visual directions as step-by-step guides that break down complex tasks into manageable parts, making it easier for students to understand what they need to do. Whether it’s a simple classroom activity or a more involved project, these visuals can make all the difference.

These are so helpful because, as we know, our Autistic learners are visual learners. When directions are only given orally- they miss a lot of the information. However, when they have the information visually as well they can refer back to them and understand them easier.
For instance, if you’re teaching a new art project, you might create a series of images showing each step—like gathering materials, drawing a sketch, painting, and cleaning up afterward. By visually outlining the process, students can refer to the directions at their own pace, reducing frustration and confusion. This helps them stay on track and gives them a sense of accomplishment as they complete each step.
These will help all students in your classroom as well. You won’t have to repeat yourself over and over again. You can simply point to the directions and the visual information does the rest.
7. Choice Boards
Choice boards are a fantastic way to empower autistic children by giving them a voice and the ability to make decisions. Think of a choice board as a menu of options that allows students to select what they want to do from a range of activities or tasks. This not only encourages autonomy but also increases engagement, as students are more likely to participate when they have a say in their learning.
For example, if you’re planning a break time, a choice board might include options like reading a book, drawing, or playing a game. By letting students pick their activity, you’re not only catering to their interests but also helping them learn the value of making choices and taking responsibility for those choices. It can be a game-changer for motivation and behavior management, as students feel more in control of their experiences.
Creating a choice board is easy and can be done in various formats—digital, printed, or even a tactile board with Velcro pieces that students can move around. The key is to keep it visually appealing and straightforward. You might want to include images or symbols alongside words to cater to different literacy levels, ensuring that every student can understand their options.
8. Emotional regulation supports
Emotional regulation supports are crucial tools for helping students manage their feelings and reactions in various situations. We know that social skills are challenging to our students, and this is something that we need to directly and explicitly teach. Included in social skills is the ability to understand and express their emotions, which is a vital skill for both academic success and social interactions.
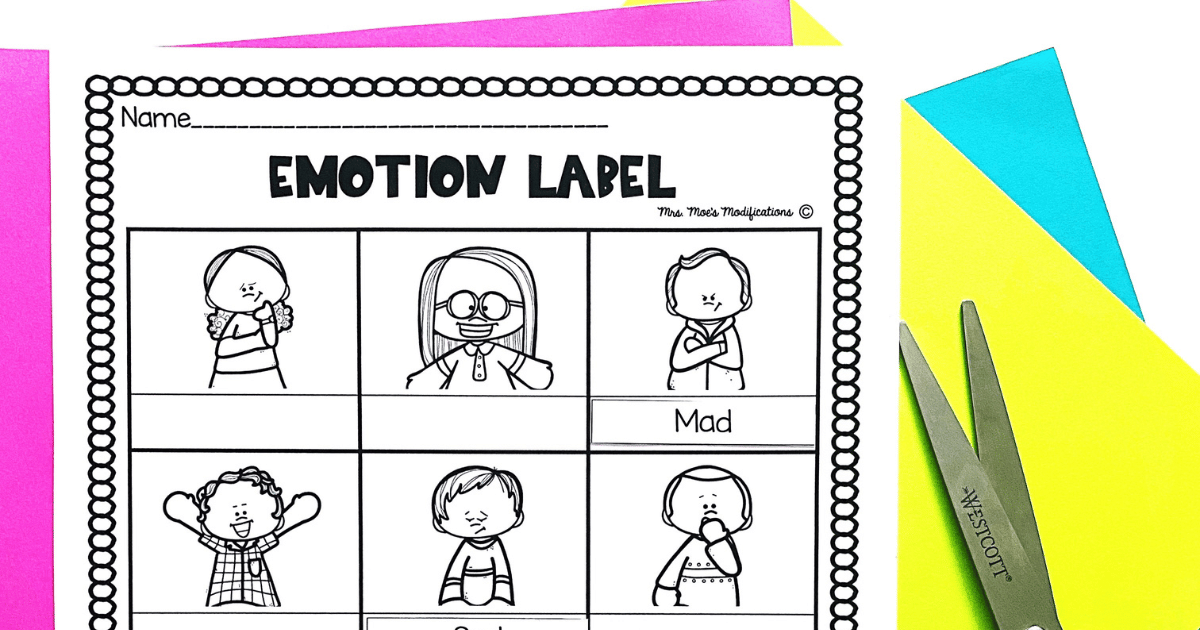
One effective way to provide emotional regulation support is through emotion charts. These charts feature images or symbols representing different feelings—like happy, sad, frustrated, or anxious. By having a visual reference, students can learn to identify their emotions and communicate them more effectively. For example, if a student is feeling overwhelmed, they can point to the “frustrated” icon, giving teachers insight into their emotional state without needing to articulate it verbally.
Another helpful resource is calm-down kits, which include items like stress balls, fidget toys, or sensory tools that students can use when they’re feeling heightened emotions. These kits can provide a safe and calming way for students to cope with their feelings and regain control of their emotions.
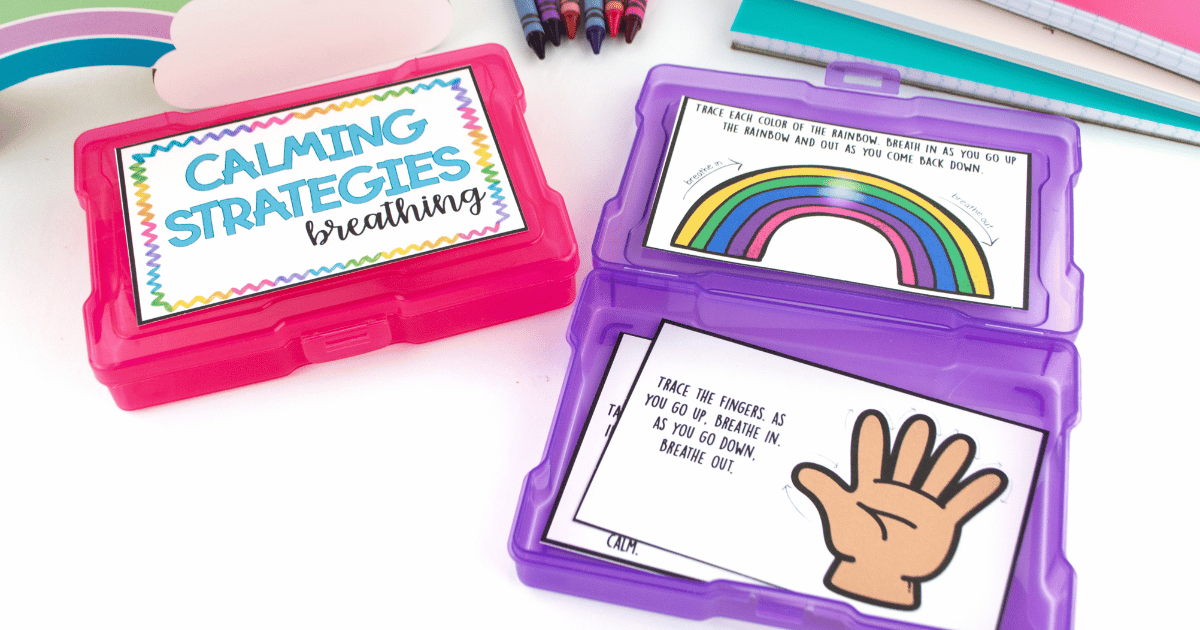
Additionally, implementing visual prompts that teach calming strategies can also be beneficial. For example, a visual guide might outline steps for deep breathing or counting to ten when feeling upset. This gives students a structured approach to managing their emotions, making it easier for them to practice self-regulation. If you want to get some free coping skills, you can grab this effective teaching tool here!
Incorporating emotional regulation supports in the classroom creates a safe space for students to explore and manage their feelings. By equipping students with these tools, you’re not just helping them cope with their emotions; you’re also fostering resilience, self-awareness, and the skills needed to build healthy relationships with their peers!
9. Token Boards
Token boards are effective visual supports that help students with autism stay motivated and engaged while learning appropriate behaviors. They work on a simple yet powerful concept: earning tokens for displaying desired behaviors or completing tasks. Once students accumulate a certain number of tokens, they can exchange them for a reward—think of it as a fun and interactive way to reinforce positive actions! If you have been around the block, you may have heard arguments against token boards. This is a valid argument, but there are many reasons to still use them. If you want to learn more about this conversation, listen to this podcast called “Why Token Boards are a Hot Topic.”

Using a token board is straightforward. Each time a student demonstrates a desired behavior—like raising their hand to speak, staying on task, or helping a classmate—they earn a token, which could be a sticker, a star, or any small object. These tokens can be placed on a designated board, and when the board is full, the student gets to enjoy a pre-determined reward, such as extra playtime, a favorite activity, or a small treat.
One of the great things about token boards is their versatility. You can customize them based on your classroom’s needs and your students’ preferences. For example, you might have different token boards for different behaviors or tasks, allowing you to target specific goals for each student. This personalization not only helps keep students motivated but also fosters a sense of ownership over their progress.
Another benefit of token boards is that they visually represent success and progress, providing instant feedback for students. As they see their tokens accumulate, they gain a sense of accomplishment, which can boost their confidence and encourage continued positive behavior.
If you want to learn exactly how to implement token boards, check out this blog post that goes into much more detail.
10. Transition Items
Transition items are an effective visual support designed to help students with autism navigate changes in their daily routines. Transitions can often be challenging for these students, as they may create anxiety or confusion about what comes next.
A transition item can simply be an item they hold during transitions. For example, I had a student who loved Spiderman. He was able to hold a small superhero only in the hallway when transitioning between areas. This helped him change from one thing to another.
You can also have a card with a picture or their name. I use this to prompt students to check their schedule for the change that is coming. This allows them to constantly during their daily schedule as a tool. By going to that every time it creates a routine and makes the transition easier.

A great tool and easy transition suggestion is to use the pause symbol. Place it in front of the student so they know it is time to pause, and they may be able to come back to it later. Saying stop can be abrupt and even trigger other behaviors.
11. Visual Timers
Visual timers are fantastic tools that help students with autism understand the concept of time, especially during transitions and timed activities. Many students struggle with grasping how long tasks will take or when they need to switch from one activity to another. Visual timers provide a clear, visual representation of time passing, which can significantly reduce anxiety and enhance focus.
These timers come in various forms, such as digital countdowns, sand timers, or colored visual timers that show the remaining time through color changes. For instance, a visual timer that fills with color as time elapses can make it easier for students to see how much longer they have until the next transition or when an activity will end. This representation helps students grasp the duration of tasks more effectively than traditional clocks, which can be abstract and challenging to understand. If you need waiting visuals that can work with a timer, click here.
Incorporating visual timers into your classroom routine is straightforward. For instance, you can use a timer during independent work time, allowing students to see how much time they have left to complete a task. This can help them manage their pace and stay focused, making the experience more productive. Additionally, visual timers can be used during transitions—like moving from one activity to another or preparing for lunch. Displaying the timer a few minutes before the change allows students to mentally prepare for what’s next, easing the transition process.
It’s also helpful to pair visual timers with verbal reminders. For example, saying, “We have five minutes left until we go to recess!” while showing the timer can reinforce understanding. This combination of auditory and visual cues creates a more holistic approach to managing time, catering to different learning styles.
Visual timers not only help students become more aware of time management but also promote a sense of autonomy. As they learn to monitor their own time, they develop essential self-regulation skills that can benefit them in various aspects of their lives. By integrating visual timers into your classroom, you’re creating a supportive environment that encourages focus, independence, and smoother transitions for all students!
12. Social Narratives
Social narratives are powerful that can help students with autism understand social situations (like body language), expectations, and appropriate behaviors. These personalized stories use simple language and visuals to illustrate various scenarios, providing students with a clear framework for navigating social interactions. By breaking down complex social situations into relatable and understandable narratives, social stories give students only the most important information they will need to navigate different situations.
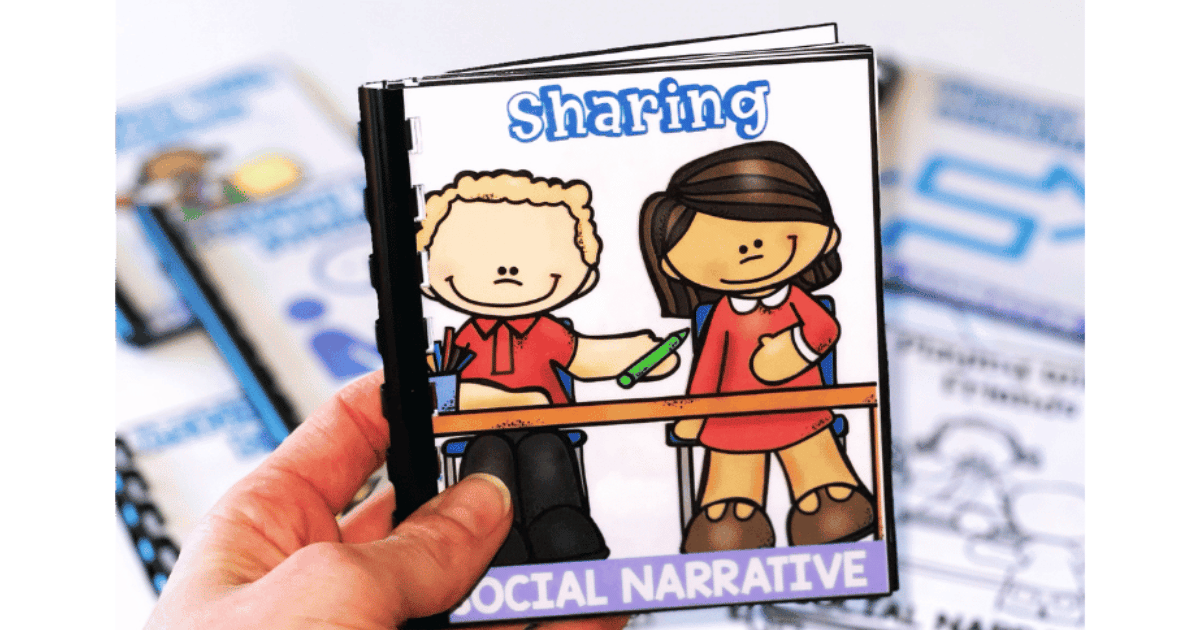
By incorporating a social narrative into your teaching practices, you’re not just supporting students in developing social skills; you’re also providing them with a roadmap for navigating the complexities of social interactions. This social script helps build their confidence, fosters empathy, and creates a more inclusive learning environment where all students can thrive!
If you want to get five free social narratives, these are great teaching tools to add to your toolbox! Click here to download.
Incorporating visual supports into your teaching practice is a game-changer for students with autism, providing them with the clarity and structure they need to navigate their learning environments. Being visual thinkers, they are key in seeing success with your students. These tools—such as visual schedules, token boards, social narratives, and emotional regulation supports—help bridge communication gaps and empower students to manage their behaviors, understand social situations, and express their feelings more effectively.
If you want all of these types of resources, but are on a budget— listen up. I have a membership that delivers fresh resources to you each & every month. For less than your coffee runs, you can have these exact tools sent to you! Interested? Check it out below!
As educators, it’s essential to remember that every student is unique, and tailoring these visual supports to meet individual needs can make all the difference. By observing your students and adapting these resources to fit their specific challenges and preferences, you create a more inclusive and supportive classroom atmosphere.
Ultimately, these types of visual supports not only enhances students’ learning experiences but also fosters their independence and confidence. As you continue to explore and implement these strategies, you’ll be equipping your students with essential skills that will benefit them far beyond the classroom. Together, we can create a nurturing environment where every student has the opportunity to thrive and succeed!